TL;DR:
- Layering compression wear for cold weather training involves wearing a snug moisture-wicking base layer, an insulating mid-layer, and a breathable outer shell to manage moisture and retain warmth effectively. Proper fit, fabric choice, and dynamic layer adjustments are essential to prevent overheating, dampness, and heat loss during outdoor or indoor sessions. Australian athletes should prioritize UPF-rated compression gear and maintain their equipment correctly for optimal performance in variable winter conditions.
Layering compression wear for cold weather training is defined as the systematic process of wearing a snug compression base layer next to your skin, followed by insulating and protective outer garments, to manage moisture, retain warmth, and maintain performance during outdoor or cold-environment sessions. For BJJ, MMA, and grappling athletes in Australia, rashguards and compression wear serve a dual purpose: they provide muscle support, reduce abrasion, and wick sweat away from the skin during intense training. In colder conditions, that moisture-wicking function becomes critical because a damp base layer accelerates heat loss and increases discomfort. Australia's high UV levels also mean that even in winter, outdoor training exposes you to significant solar radiation, making UPF 50+ rated compression gear, tested to AS 4399:2020, a smart choice year-round. The sections below break down exactly how to build your layering system, select the right fabrics, and manage your layers dynamically throughout a session.
How to layer compression wear for cold weather training
The foundation of any cold weather layering system is the three-layer model. The North Face frames it clearly: the base layer moves sweat away from your skin, the mid-layer retains breathable warmth, and the outer shell shields you from wind and rain while allowing heat to escape. Each layer has a specific job, and compression wear fills the base layer role better than most alternatives.
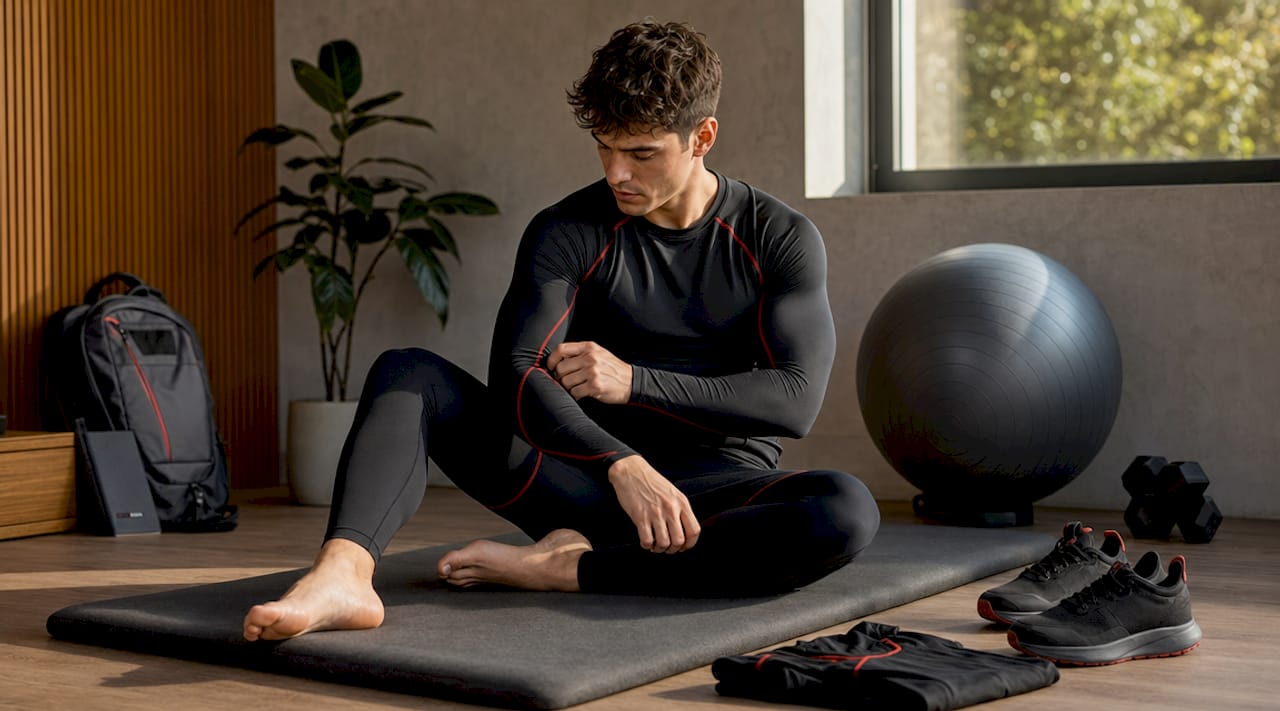
Your compression rashguard or compression tights sit directly against your skin. Their primary function at this layer is moisture transfer. Sweat moves through the fabric and away from your body, preventing the cold, clammy feeling that follows intense effort. Compression also stabilises working muscles, which reduces fatigue during longer sessions. For cold weather training gear, this combination of moisture management and muscle support makes compression the logical starting point.
The mid-layer sits over your compression base and provides insulation. Fleece, softshell panels, and merino wool blends all work well here. The key is that this layer traps warm air without restricting your movement or holding onto sweat. A lightweight fleece pullover or a dry-fit quarter-zip in 100% polyester sits well over compression and allows easy removal when intensity rises.
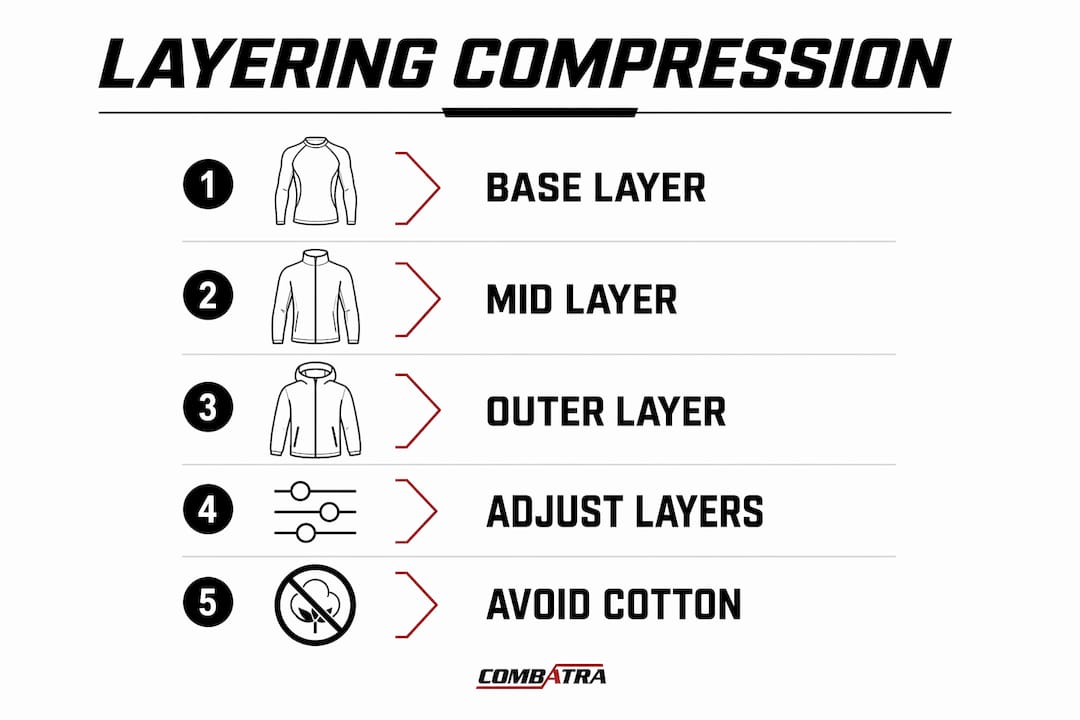
The outer shell handles wind, rain, and snow. It needs to be breathable. A non-breathable waterproof jacket traps sweat vapour inside your insulation, which defeats the purpose of your base layer entirely. Look for membranes that allow moisture to migrate outward while blocking external elements.
Here is how the three layers work together for different training scenarios:
- Low-intensity training at 5°C or below: Wear your compression base, a mid-weight fleece or merino mid-layer, and a breathable outer shell. You need the full system because your body generates less heat.
- High-intensity intervals at 5°C: Start with your compression base and outer shell only. Löffler recommends one fewer layer at high intensity, because your body heat output is significantly higher during hard efforts.
- Indoor cold training: The same base and mid-layer principles apply, but you can usually skip the outer shell unless the training environment is particularly cold or draughty.
Pro Tip: Lay out your layers the night before and mentally rehearse when you will remove or add each one. Knowing your plan in advance means you act quickly when intensity changes, rather than overheating before you react.
What to look for when selecting compression wear and layers
Fit is the most important variable when choosing your best clothing layers for cold training. Your compression base layer should feel snug across the chest, shoulders, and legs without restricting your breathing during deep inhalation. Gymwear.us advises that compression works best as a base layer with a relaxed mid-layer and shell that allow expansion during high-intensity intervals. If your outer layers are too tight, they compress the insulation in your mid-layer, reducing the trapped air that keeps you warm.
Fabric choice matters as much as fit. The table below compares the most common base layer materials for cold weather training:
| Fabric | Moisture wicking | Warmth when wet | Recommended use |
|---|---|---|---|
| Synthetic blend (polyester/spandex) | Excellent | Good | High-intensity sessions, BJJ, MMA |
| Merino wool blend | Very good | Excellent | Low-intensity, endurance, cold mornings |
| Cotton | Poor | Very poor | Not recommended for cold training |
Cotton is the one fabric to avoid entirely. Wet cotton dramatically accelerates heat loss, and in windy conditions, the window for hypothermia risk narrows from hours to minutes compared to synthetic or merino alternatives. This is not a minor inconvenience. It is a genuine safety consideration for outdoor winter sessions.
Your mid-layer should have enough room to sit comfortably over your compression without bunching. A fingertip of space between the mid-layer and your compression is a practical guide. Accessories complete the system. Gloves, a thermal beanie, and merino or synthetic neck gaiters address the extremities and neck, which are significant heat-loss points that your core layers cannot cover.
Pro Tip: When trying on mid-layers over compression, mimic your training movements: squat, rotate your torso, and raise your arms overhead. If the mid-layer rides up or restricts your range of motion, it will cause problems during training.
Step-by-step layering strategy for a cold weather session
A practical layering workflow removes guesswork and keeps you comfortable from warm-up through cool-down. Follow this sequence for outdoor sessions in cold conditions:
- Start with your compression base layer. Put on your rashguard or compression tights first. Check that the fit is snug but not restrictive across the chest and hips.
- Add your mid-layer if the temperature is below 10°C or your session starts at low intensity. A fleece or merino mid-layer over your compression base provides immediate warmth during the first minutes of movement.
- Add your outer shell before stepping outside. Even if you plan to remove it quickly, starting with the shell protects you from wind chill during the initial warm-up phase.
- Begin your warm-up with all layers on. Gymwear.us recommends a full 10-minute warm-up with your base and shell in place before adjusting layers.
- Vent or remove layers as intensity rises. Unzip your outer shell first. If you are moving into high-intensity intervals, remove the mid-layer and store it in a bag or tie it around your waist. Your compression base handles the load from here.
- Replace layers during rest intervals or cool-down. When your heart rate drops, your body temperature follows quickly. Put your mid-layer back on within 60 to 90 seconds of stopping hard effort to prevent the sweat on your compression base from chilling you.
- Change your compression base layer after training if possible. A damp base layer against your skin during a cool-down walk or drive home is uncomfortable and counterproductive.
Key considerations for different temperature scenarios:
- At 0°C, treat every rest period as a re-layering moment. The margin for error is small.
- At 5°C with low wind, a compression base and mid-layer may be sufficient for moderate-intensity sessions.
- At 10°C with rain, a breathable outer shell becomes non-negotiable even at high intensity, because wet wind strips heat faster than dry cold.
Common mistakes when layering compression wear in the cold
Most layering failures come down to a small set of predictable errors. Recognising them in advance saves you from a miserable session.
- Wearing layers that are too tight across the mid and outer. Overly tight mid-layers compress insulation loft and restrict circulation. The warmth you expect from a fleece disappears when it is pressed flat against your compression base.
- Using cotton in any layer. This applies to socks, base layers, and even casual hoodies worn over compression. Cotton absorbs sweat and holds it, turning your warmth system into a cold, wet trap.
- Stacking non-breathable waterproof layers. Moisture transport requires each successive layer to be more breathable than the one beneath it. If you place a non-breathable shell over a breathable mid-layer, sweat vapour condenses inside the insulation and you end up wet from the inside.
- Ignoring intensity changes. Many athletes dress for the starting temperature and never adjust. Your body heat output during a hard interval session at 5°C can match what you generate in a warm gym. Failing to vent layers leads to overheating, excessive sweating, and a cold, damp chill when you stop.
- Overdressing at the base layer instead of adjusting mid and outer layers. A thicker compression base does not replace a proper mid-layer. The base layer's job is moisture transfer, not insulation. Adding bulk at the base disrupts that function.
"The most common cold weather training mistake is treating your compression base like insulation. It is not. It moves moisture. Your mid-layer provides warmth. Confusing the two roles leads to a wet, cold athlete within 20 minutes of hard effort."
Test your layering setup during a low-stakes session before relying on it for a race or important training block. Note where you feel cold, where you overheat, and how quickly you need to vent layers. That data is more useful than any general guide.
Key takeaways
Layering compression wear for cold weather training works when each layer performs its specific role: the compression base moves moisture, the mid-layer retains warmth, and the outer shell blocks the elements.
| Point | Details |
|---|---|
| Compression as base layer | Wear a snug synthetic or merino compression layer next to skin for moisture transfer and muscle support. |
| Fabric choice is critical | Avoid cotton entirely; synthetic blends and merino wool maintain warmth and moisture management when wet. |
| Fit affects insulation | Mid and outer layers must allow space over compression to preserve insulation loft and blood flow. |
| Dynamic layer management | Vent or remove layers within minutes of intensity rising to prevent overheating and damp chill. |
| Breathability gradient | Each layer must be more breathable than the one beneath it to allow moisture to migrate outward. |
What I have learned from training in Australian cold conditions
Australian cold is deceptive. A 7°C morning in Canberra or the Blue Mountains feels manageable until wind picks up and your compression base is soaked from 20 minutes of hard sparring drills. I have made the mistake of treating a single thick layer as a substitute for a proper three-layer system, and the result is always the same: fine for the first 15 minutes, then progressively uncomfortable as sweat accumulates.
What I have found actually works is treating layering as a live process, not a pre-session decision. You need to be willing to stop, remove a layer, and stuff it in your bag mid-session. Athletes who resist this because it feels disruptive are the ones who finish training cold and damp. The two minutes it takes to vent a mid-layer during a rest interval are worth it.
I also think Australian athletes underestimate how much UV exposure still occurs during winter outdoor training. A UPF 50+ compression base is not just a summer item. You can explore how compression sleeves compare to rashguards for outdoor sessions if you are deciding between coverage options. The right base layer choice covers both thermal and UV protection in a single garment, which simplifies your kit considerably.
Finally, do not neglect maintenance. Compression fabric loses elasticity and moisture-wicking performance when washed in hot water or dried in a tumble dryer. Cold wash, air dry, and your gear will perform consistently across an entire winter season.
— McGinnis
Build your cold weather training kit with Combatra
Combatra designs compression wear built for Australian athletes who train hard in real conditions. The custom BJJ rashguard range is rated UPF 50+ and constructed from breathable, moisture-wicking fabric that performs as a base layer in cold weather training setups. Whether you are running outdoor circuits, drilling BJJ, or training MMA in a cold gym, Combatra's compression base layers are built to anchor your layering system without restricting movement. You can personalise your gear with names, logos, and colours for individual athletes or full academy teams. Explore the full range at Combatra and find the compression base layer that fits your training environment.
FAQ
What is the best base layer for cold weather training?
A snug synthetic blend or merino wool compression rashguard is the best base layer for cold weather training. These fabrics wick moisture away from your skin and retain warmth even when damp, unlike cotton which holds sweat and accelerates heat loss.
How many layers should you wear for outdoor winter training?
Three layers are standard for cold weather outdoor training: a compression base layer, an insulating mid-layer such as fleece or merino, and a breathable outer shell. At high intensity, you can reduce to two layers by removing the mid-layer once your body heat rises.
Can compression wear be worn as the only layer in cold weather?
Compression wear alone is not sufficient below approximately 10°C for low-intensity training. It manages moisture effectively but provides minimal insulation. Add a mid-layer and outer shell to retain warmth, particularly during warm-up and cool-down phases.
Why should you avoid cotton layers when training in the cold?
Cotton absorbs and retains sweat rather than wicking it away, which causes rapid heat loss when wet. In cold and windy conditions, a wet cotton layer significantly increases the risk of hypothermia compared to synthetic or merino alternatives.
How do you adjust layers during a training session?
Remove or vent your outer shell first as intensity rises, then your mid-layer if needed, leaving your compression base to manage moisture. Replace layers within 60 to 90 seconds of stopping hard effort to prevent your damp base layer from chilling you during rest intervals.